Showing posts with label bathroom renovation. Show all posts

Wednesday, November 14, 2012

bathroom renovation - part 3: river rock accent floor

I love river rocks in the bathroom.They can make the room look spa-like, rustic, modern or luxurious. River rocks can be used in shower areas, floors and walls but, even good things have their drawbacks; They are hard to clean, can be a breeding ground for mold, they can come loose. I decided to use them in my bathroom as an accent. River rocks can be found in square sheets with a mesh background at your local hardware stores or you can DIY like I did. I picked out river rocks matching my tiles at Michaels craft store. I thought they were more flexible to work with and they had the natural look I was looking for.

Here is my DIY river rock border accent floor step by step;


First, I applied a thin coat of cement to build a base over the waterproofed floor to prepare the installment. I could not apply ready thinset directly on the floor because it would not stick to the waterproofing. The surrounding area was taped off to keep it clean.

River rocks were sealed and left dry before installing.

River rocks ready for installing. I tried to select fairly flat rocks and used paper for the layout. When I got to the tub area I changed to randomly placing river rocks.

After installing I used a wood board to level the stones. It did not work so well with these rocks since they have different thickness.

Grouting the river rocks was not so easy. In the above picture the grouting is partially done. I left a small gap between the rocks that unfortunately resulted in larger spaces when grouted. I am not sure if even touching stones would have made much difference because, the rocks are not very flat so when you grout them most of it is covered. I removed the excess grout around the rocks as much as possible to uncover them but now, I have uneven grout with pockets that hold water and dirt. It looks more natural than pre-fab sheets but keeping it clean will be a challenge... :)

Here is the result.

Jade Buddha pendant in a corner where won't get stepped on. Still needs cleaning :)

This is how it looks.

Next, bathtub and accessories...


Thursday, November 8, 2012

bathroom renovation - part 2: a tiled tub wall

Okay, this is the how to part, I thought posting it could help others. I personally do not like plain alcove bathtubs, they are not so esthetically attractive. I would prefer a built-in tub but, since I live in an apartment I did not want to invest that much, at the same time I wanted to have something pleasing to the eye. So as a husband & wife DIY team we decided to build a tiled wall for our cast iron tub. We had an idea how to build a tiled apron and found a further guide in the book, Black&Decker Complete Guide to Bathrooms. It was not as hard as I expected, that may be because my husband built the frame. All you have to do is construct a 2X4 frame in front of the tub, cover it with waterproof backer cement board secured to the studs.

Here are some pictures from the book;

 
Black&Decker Complete Guide to Bathrooms.


Here is how the frame looks.


We also waterproofed the frame using RedGard and covered the side facing the tub with waterproof backer cement board. The existing wall studs did not aligned with our frame so we added new studs in the wall. The frame was secured to floor and new wall studs using waterproof dry wall screws. Then we finished covering the front and top of the frame with cement board.


Here is the backer board taped, spackled and ready to tile.


And the tiled wall. I found matching travertine molding for the top. It fit perfectly.

After finishing the tiled wall, I waterproofed the floor. Hopefully it will keep water tight.

When I applied the silicone caulk around the tub, I used a caulk matching the grout color. Applying silicone is made easier and cleaner by taping off the tub and tile. Once the silicone is on and before it dries, remove the tape with excess caulk.

Next, the floor river rock accents...


Friday, November 2, 2012

bathroom renovation - part 1: vanity

A few months ago -feels like ages- I posted about my bathroom renovation called "bye bye blue tiles". Finally no more 1960's blue tiles... YAY! Husband & wife team DIY renovation is done, well sorta. I still have to decide about the glass bathtub screen. I am so done with shower curtains; They get moldy, rooms appear darker and smaller. I posted earlier about the products that I used for my bathroom here and for decorative accessories here .

Reusing some of the items in the room -the old Chinese mirror, cabinet and the screen- definitely helped the budget. If you notice -in the second picture on the right- the oil rubbed bronze finish already started creeping up in my old bathroom, the bronze shaving mirror and switch plates hinting what I wanted in my future bathroom. I still keep my own handmade Buddha tiles as souvenir, they were covering the empty spots of ugly soap dishes that I removed.

before 


Chinese screen and Turkish hammam bowls and ugly blue tiles...

Say bye bye to the blue tiles. Now you see it...

Now you don't...

I was debating to use a wood sink or a porcelain sink. 

And the decision is... 

after
Yes, I went with this white porcelain vessel sink from Lowe's. It is easy to maintain and looks clean.The Tuscan bronze Ashfield vessel faucet is also from Lowe's.

Here is the Indonesian teak wood sink from HomeGoods. Unfortunately, I did not use this sink that I loved so much, I feel the porcelain matched the decor better. I am sure this sink would be great for a powder room.


Here is my asian/zen/rustic/eclectic bathroom. I painted the walls and the ceiling same white color. It makes the room fresh, larger and unified. Repetition of forms, textures and colors also make a great unifying effect in a small bathroom. I wanted to achive it with adding natural elements such as travertine tiles, wood and accessories throughout the bathroom. Repeating round shapes around the vanity also add a certain softness to the bathroom. I feel using earthy neutral tones create a serene sense of calm. I can stay here forever :)

I mixed two vanity lamps to get this look. The original lampshades were old style bell shaped. I had to buy another vanity lamp for their shades. It cost more but looks much cleaner. I love expandable shaving mirrors. It was hard to find a decent one especially in oil rubbed bronze. I found mine at Van Dyke's Restorers. 

And my lovely fouta hammam towels from ebay.

I changed the flush handle to bronze, bought a toilet seat with bronze hardware from Amazon.com and saved some cash by spray painting the valve and water tube with Rust-Oleum Universal Metallic Paint & Primer in One.

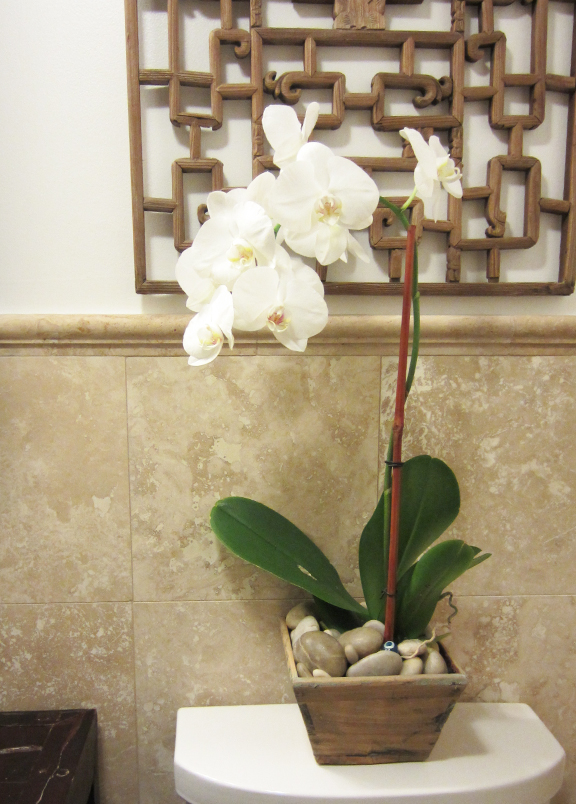
Love white orchids they are so pure and look sophisticated in every decor. Hoping this one last for a while. I found this Chinese wood box at T.J.Maxx. It was blue before I stripped it to give this natural look.


Natural stone accessories from HomeGoods match the stone tiles. They last long and are easy to clean.

And finally hand soaps. Moroccan Argan oil hand wash from HomeGoods. Smells so good. Buddha hand soaps from ebay. They also smell good.


Next week, a look at the bathtub area. Stay tuned...

Have a great weekend, XOXO :)


Tuesday, June 26, 2012

some products for my bathroom renovation

Here are some products I am going to use for my bathroom renovation;


via homedepot

12X12 International (Turkish) Ivory Travertine tiles for walls. They are heavy tiles, especially 18X18. My husband and I spent long hours at multiple stores to pick out the good tiles one by one. They are cheaper than the specialty stores. I like the quality too. I used smilar ones in my master bathroom and kitchen.


via homedepot

18X18 International (Turkish) Walnut Travertine tiles for the floor.


via homedepot

Travertine wall trim.

Ivory travertine corner shelves from a local tile store.


River rocks from Michaels craft store. I always liked river rocks in bathrooms it gives a spa feeling. I plan to use them along one wall. It provides a natural earthy look and softens the lines.

Zoomed: Pfister Ashfield Tuscan Bronze 1-Handle WaterSense Bathroom Faucet (Drain Included)
via lowe's

Pfister Ashfield Tuscan Bronze 1-Handle WaterSense Bathroom Faucet. I used this for my master bathroom, I love the style so much I ended up purchasing the same one.


Expandable Mirror. I just ordered an oil rubbed bronze finish. Love the old look. I splurged on this one. It was on sale but, still a little pricey for a tiny mirror. It was very hard to find this scissors style. IKEA had the crome finish that was cheap looking. I had one in my old bathroom. Restoration Hardware sells them too but, they are too expensive. I hope the quality is as good as it looks.

Pfister Brh-E0Yy Catalina Robe Hook Tuscan Bronze
via ebay   homebuilderwholesale101

Pfister Tuscan Bronze Catalina Single Robe Hook.


via ebay  buildinc

Pfister Tuscan Bronze Catalina Tissue Holder.

I purchased mine a while ago from ebay. I found these sellers have them now.

Zoomed: KOHLER 60" x 30-1/4" Villager White Rectangular Tub
via lowe's

Kohler Villager White cast iron tub.
New Oil Rubbed Bronze Trip-Lever Bathtub Drain Trim Kit


via ebay wholesale_plumbing 

Oil Rubbed Bronze Trip-Lever Bathtub Drain Trim Kit.

Zoomed: KOHLER Cimarron White High Efficiency WaterSense Elongated 2-Piece Toilet
via lowe's

Kohler Cimarron White High Eficiency WaterSense Elongated toilet.

Zoomed: Plumb Pak Venetian Bronze Latch Door Style Tank Lever
via lowe's

Venetian Bronze Latch Door Style Tank Lever.


Toilet Seat, Bemis 44OR 000 White, Round w Non-Tarnish Oil Rubbed Bronze Hinges
via amazon.com 

Toilet Seat, Mayfair 44OR 000 Molded Toilet Seat with Oil-Rubbed Bronze Hinges, Round, White. Love the bronze hinges.

Checkolite 7683-34 Price Pfister Catalina Collection 3-Light Vanity, Oil Rubbed Bronze
via amazon.com

Checkolite Price Pfister Catalina 3-Light Vanity, Oil Rubbed Bronze.

Portfolio 3-Light Oil-Rubbed Bronze Bathroom Vanity Light
via lowe's

Portfolio 3-Light Oil Rubbed Bronze Bathroom Vanity Light.

I mixed two vanity lamps. I first purchased the The Checkolite Price Pfister vanity lamps which matched with my all bathroom accesories but, did not like it's bell shaped lamp shades. They looked old. I found Portfolio vanity lamp for their shades to get the look I wanted.

I am thinking about ordering the following product;
 
Bathtub Shower Screen, (Tub door, Shower Shield), 5/16" (8mm) Safety Glass

Still thinking on this one... Has anyone used this kind of bathtub screen? I am so done with shower curtains; They get moldy and rooms appear darker and smaller. I found this Bathtub Shower Screen (Tub door, Shower Shield) on ebay. I like the clean look. It is called European frameless shower door. I also started talking to local glass and bathroom specialits. Unfortunately local hardware stores don't sell them even with special orders.
More to follow...


Thursday, June 21, 2012

bye bye blue tiles... a bathroom renovation

My husband and I started renovating one of our bathrooms. No more 1960's blue tiles...YAY! I am going to reuse some of the items in the room; The Chinese mirror, cabinet and the screen... Hope to post some more pictures later...


Now you see it...

Now you don't...